Create a Baserow Table by Importing a CSV or Excel File
Instead of typing data in by hand, upload a CSV, JSON, XML, or Excel file, or paste data straight from a spreadsheet, and Baserow builds a matching table with the right fields and rows automatically.
Overview
Importing produces a fully populated table from an existing data file or spreadsheet without manual entry - upload the file and Baserow creates a table with appropriate fields and rows. This is the fastest way to bring data from spreadsheets, exports, or other platforms into Baserow.
Supported Import Formats
| Format | Best for | File extension |
|---|---|---|
| Paste data | Quick transfers from spreadsheets | - |
| CSV | Simple tabular data from any spreadsheet app | .csv |
| JSON | Structured data exports from APIs or apps | .json |
| XML | Hierarchical data from technical systems | .xml |
| Excel | Spreadsheet files | .xlsx, .xls, .ods |
Every import method is capped at 5,000 rows per table; for larger datasets, split the file and import it in batches.
Before Importing: Preparing the Data
Clean the data: remove empty rows and columns, keep formatting consistent (one date format, numbers without stray text), and make sure column headers are unique and descriptive.
Mind the format: the first row should hold column headers (recommended, not required); each column should hold one type of data; keep the file under 10 MB when possible.
All imported data starts out as text fields. After importing, convert the fields to the right types (numbers, dates, select options, and so on) - or import into an existing table instead to use field types that are already configured.
How to Import Data
Method 1: Paste Data from a Spreadsheet
The fastest option for copying data straight out of Excel, Google Sheets, or another spreadsheet app - no intermediate file needed.
- Open a database in the sidebar and click + New table.
- Enter a descriptive name for the new table.
- Select Paste table data.
- Copy cells from the spreadsheet (Ctrl+C or Cmd+C) and paste them into the text area.
- Check First row is header if the pasted data includes column names.
- Review the preview and click Add table.
Method 2: Import a CSV File
CSV (comma-separated values) is the universal format every spreadsheet app supports.
- Open a database and click + New table.
- Enter a table name.
- Select Import a CSV file and upload it.
- Configure the column separator (usually a comma, sometimes a semicolon or tab), the encoding (UTF-8 works for most files), and whether the first row is a header.
- Review the preview and click Add table.
If the data looks scrambled, try a different column separator; if special characters look wrong, try a different encoding.
Method 3: Import a JSON File
JSON files hold structured data and are common exports from APIs, databases, and web applications.
- Open a database, click + New table, and name it.
- Select Import a JSON file and upload it.
- Choose the encoding (usually UTF-8), check the data structure in the preview, and click Add table.
The file must be an array of objects sharing the same keys; nested objects get flattened during import.
Method 4: Import an XML File
XML files hold hierarchical data, often exported from technical or enterprise systems.
- Open a database, click + New table, and name it.
- Select Import an XML file and upload it.
- Review the preview and click Add table.
Complex nested structures get simplified on import, so a file with a flat, tabular structure works best.
Method 5: Import an Excel File
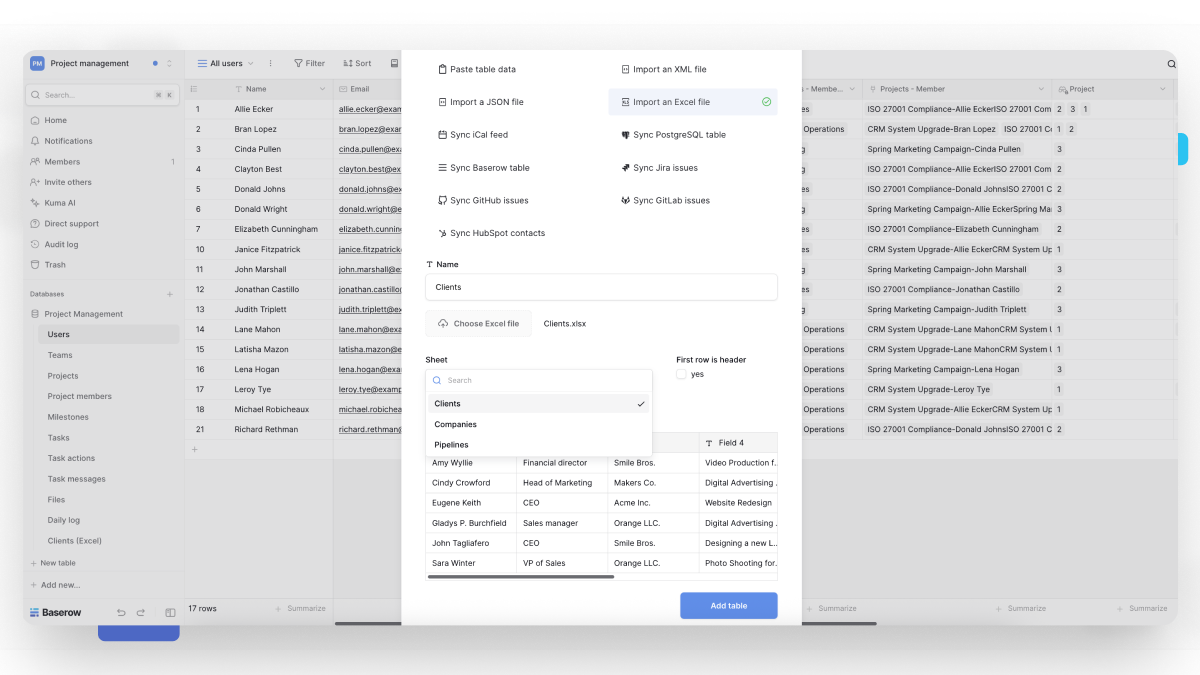
Import an existing Excel workbook (.xlsx, .xls, or .ods) directly into a new Baserow table:
- Open the database.
- Click + Add table.
- Select Import an Excel file and enter a table name.
- Click Choose Excel file and select the workbook.
- If the workbook has multiple sheets, choose the one to import from the Sheet dropdown.
- Choose whether the first row should be used as column headers.
- Review the preview and click Add table.
After Importing: Next Steps
All imported data starts as text fields - convert them to the right types: text that looks like numbers into a number field, text with dates into a date field, repeated values into a single or multiple select field. If the imported data references other tables, set up link-to-table fields, and set up filters and sorting to work with the result.
Fixing Common Import Issues
Import stuck pending. Usually a system timeout or file-processing issue; jobs fail and clear automatically after 90-95 minutes. Wait for the timeout, then retry with a smaller file.
Data lands in the wrong columns. Typically wrong separator detection (CSV) or a malformed file - manually set the correct column separator.
Special characters look wrong. Usually an encoding mismatch; try a different encoding, most often UTF-8.
Import exceeds the row limit. Split the file into pieces under 5,000 rows each and import them separately.
Frequently Asked Questions
What is the difference between creating a table via import and importing into an existing table? Creating via import builds a new table with automatic structure detection, and every field starts as text. Importing into an existing table adds data to fields that are already configured with the right types.
Can I import several files at once? No, import one file at a time - each import creates a separate table.
Why do dates and numbers show up as text? All imported data starts as text fields to avoid data loss from incorrect type conversion; convert the fields manually after importing.
How do I import more than 5,000 rows? Split the large file into smaller ones under 5,000 rows each, import them as separate tables, and consolidate afterward if needed.
Can I preview the data before finishing the import? Yes, every import method shows a preview before the table is created, so column separation, encoding, and structure can be checked first.
Next, read Import Data into an Existing Table to learn how to add and update data in a table that is already set up.