Installing pfSense - Step-by-Step Deployment Guide
Installing pfSense involves several sequential stages: downloading the installer image, preparing bootable media, installing the system to disk, assigning network interfaces, and completing initial configuration through the web GUI. This guide covers installation on both physical hardware and virtualization platforms and is intended for administrators with foundational networking knowledge.
Prerequisites
Before starting the installation, verify that the following conditions are met:
- Hardware meets the pfSense system requirements - amd64 CPU, at least 1 GB RAM, at least 8 GB storage
- At least two network interfaces are available for a standard WAN + LAN configuration (a single interface is acceptable but limits functionality)
- A USB drive of at least 2 GB capacity or a DVD is available for the installer image
- Internet connectivity is available on the WAN interface (required for package downloads during installation)
- For virtual machines - virtual network adapters of the appropriate type are configured (VirtIO, VMXNET3, or E1000 depending on the platform)
Downloading the Installer Image
pfSense installation images are available from the Netgate Store at https://shop.netgate.com/products/netgate-installer. A Netgate Store account is required to download - registration is free.
Image Types
| Image Type | Purpose |
|---|---|
| AMD64 Memstick (VGA) | USB installation on hardware with video output |
| AMD64 Memstick (Serial) | USB installation on hardware with serial console |
| AMD64 ISO | Installation from optical media or virtual drive (IPMI, iLO, virtualization) |
| AARCH64 Memstick ARM | Installation on 64-bit ARM devices (Netgate 1100, 2100) |
For most physical servers and workstations, select AMD64 Memstick (VGA). The ISO image is preferable for virtualized environments or IPMI/iLO installations, as it can be mounted as a virtual drive.
Architecture Selection
pfSense supports only the 64-bit architecture. 32-bit systems are not supported. When downloading, ensure the AMD64 (also known as x86-64) image is selected - this architecture covers all modern Intel and AMD processors.
Verifying Image Integrity
After downloading, verify the SHA-256 checksum of the file against the official checksums published on the Netgate website. Verification must be performed before decompressing the archive.
# Linux
sha256sum pfSense-plus-installer-*.img.gz

# macOS
shasum -a 256 pfSense-plus-installer-*.img.gz

# FreeBSD
sha256 pfSense-plus-installer-*.img.gz
# Windows PowerShell
Get-FileHash pfSense-plus-installer-*.img.gz -Algorithm SHA256Warning:
Safari on macOS automatically decompresses downloaded archives by default, which prevents checksum verification. Disable this behavior in Safari preferences before downloading or use a different browser.
Preparing the Boot Media
The installer image is distributed in compressed .gz format. It must be decompressed before writing to media.
Decompressing the Image
# Linux / macOS / FreeBSD
gunzip pfSense-plus-installer-*.img.gz
On Windows, use 7-Zip for decompression.
Writing to a USB Drive
Warning:
Writing the installer image completely destroys all data on the target device. Verify that the correct device is selected before proceeding. Choosing the wrong device will result in irreversible data loss on the system disk.
Linux
Identify the USB drive device name using lsblk, then write the image:
sudo dd if=pfSense-plus-installer-*.img of=/dev/sdX bs=4M status=progress
sync
Replace /dev/sdX with the actual device name (e.g., /dev/sdb). Specify the entire disk device, not a partition - use /dev/sdb, not /dev/sdb1.
macOS
Unmount the drive before writing:
sudo diskutil unmountDisk /dev/diskN
sudo dd if=pfSense-plus-installer-*.img of=/dev/rdiskN bs=4m status=progress
sudo diskutil eject /dev/diskN
Replace /dev/diskN with the actual device name. Using /dev/rdiskN (raw device) instead of /dev/diskN significantly speeds up the write process.
Windows
The following utilities are recommended for writing on Windows:
- Etcher (balena.io) - supports writing compressed images directly and includes safeguards against selecting the system disk. Recommended option
- Win32 Disk Imager - an alternative utility that displays only removable devices, reducing the risk of accidental system disk overwrite
In both cases, select the image file and the target device, then start the write process.
Writing to DVD
ISO format images can be burned to DVD using standard operating system tools:
- Windows - built-in disc image burner (right-click the ISO file, select “Burn disc image”)
- Linux -
wodim,xorriso, or Brasero GUI - macOS - Finder or the
hdiutil burnutility
Installation Process
Booting from the Installation Media
Connect the USB drive or insert the DVD, then power on or reboot the target system. If necessary, change the boot priority in BIOS/UEFI so that the system boots from the installation media.
After booting, the installer menu will appear.
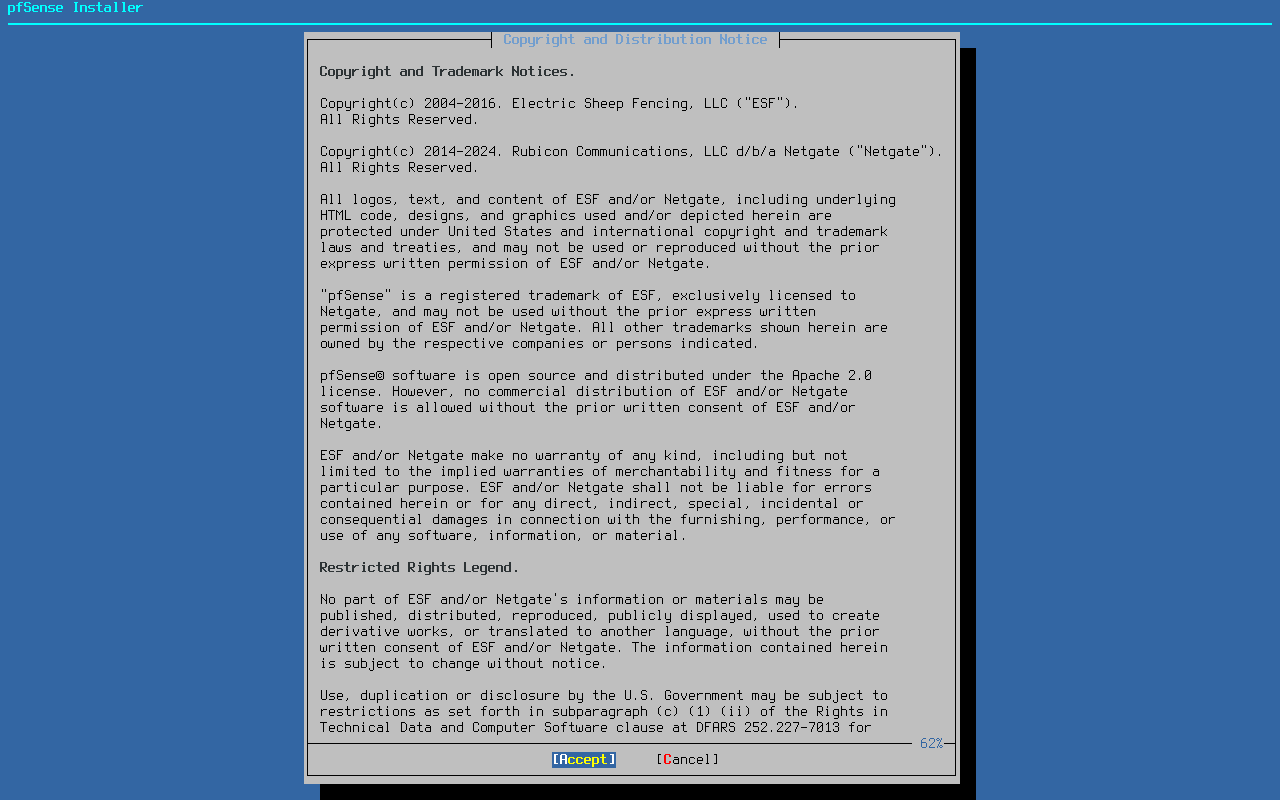
Fig. 1. pfSense installer boot menu
When connecting via serial console, the installer will prompt for a terminal type: ansi, vt100, xterm, or cons25w.
License Agreement
The first installer screen presents the pfSense license agreement. Accepting its terms is required to continue. Navigate with Page Up/Page Down keys and confirm with Enter.
Installer Main Menu
After accepting the license, the main menu appears with the following options:
- Install - begin installation
- Rescue Shell - open a command shell for recovery
- Configuration Restore - restore configuration from a previous installation or USB media
- Advanced Options - additional installation parameters
For a standard installation, select Install.
Network Configuration
The installer requires internet connectivity via the WAN interface for package downloads. At this stage:
- Select the WAN interface from the list of detected network adapters
- Configure the connection - DHCP (default), static IP address, or PPPoE
- Configure VLAN tagging if needed
- Select the LAN interface and set its parameters (defaults: 192.168.1.1/24, DHCP server enabled with range 192.168.1.100–192.168.1.150)
Filesystem Selection
The installer offers a choice between two filesystems:
| Filesystem | Characteristics |
|---|---|
| ZFS | Modern filesystem with boot environments, data checksums, and snapshots. Recommended for most deployments. Higher resource consumption |
| UFS | Traditional FreeBSD filesystem. Lower resource usage but lacks ZFS features. Suitable for resource-constrained systems |
ZFS is recommended for production deployments. The boot environments feature allows rolling back to a previous system version after a failed upgrade - a critical capability for a firewall appliance.
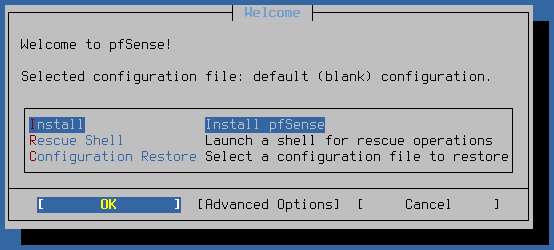
Fig. 2. Disk selection during installation
Partition Scheme and Disk Layout
The installer offers a choice of partition schemes:
- GPT - modern standard, compatible with most amd64 hardware. Recommended
- MBR - legacy partition scheme providing compatibility with older hardware. Used on ARM platforms
When ZFS is selected, the following disk organization modes are available:
| Mode | Description | Requirements |
|---|---|---|
| Stripe | Data written across disks without redundancy. Maximum capacity | 1+ disks |
| Mirror | Data mirrored across disks. Protects against single disk failure | 2+ disks |
| RAID-Z1 | Analogous to RAID-5. Protects against single disk failure | 3+ disks |
| RAID-Z2 | Analogous to RAID-6. Protects against two disk failures | 4+ disks |
| RAID-Z3 | Protects against three disk failures | 5+ disks |
For a single disk, use Stripe. With two disks, Mirror is recommended - it provides fault tolerance without significant configuration complexity.
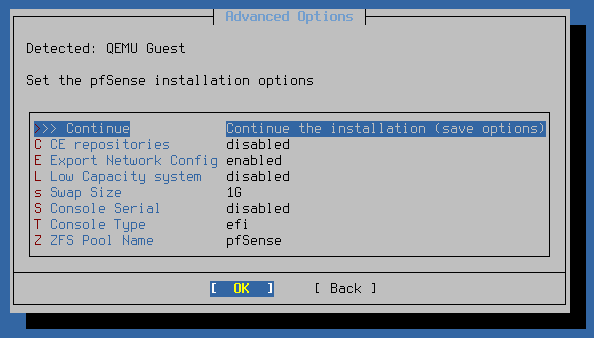
Fig. 3. Disk organization mode selection (ZFS)
Advanced Installation Options
The Advanced Options menu provides the following settings:
- Swap Size - swap partition size (automatically determined by default; can be set manually, e.g.,
1G; use0to disable swap) - Low Capacity System - mode for devices with less than 4 GB storage: disables swap, defaults to UFS with MBR
- ZFS Pool Name - ZFS pool name (default:
pfSense) - Console Type - console type: EFI, Video, or None
- Wipe Disks - clear partition and filesystem metadata on target disks before installation
Confirmation and Installation
After selecting all parameters, the installer displays a warning that all data on the selected disks will be destroyed. Upon confirmation, the selected pfSense version will be downloaded and installed.
When installation completes, the system offers a choice to reboot or open a command shell for additional configuration. Remove the installation media before rebooting so the system boots from the internal disk.
Interface Assignment
After the first boot from the installed system, pfSense displays a console menu. On the initial launch, the system prompts for network interface assignment.
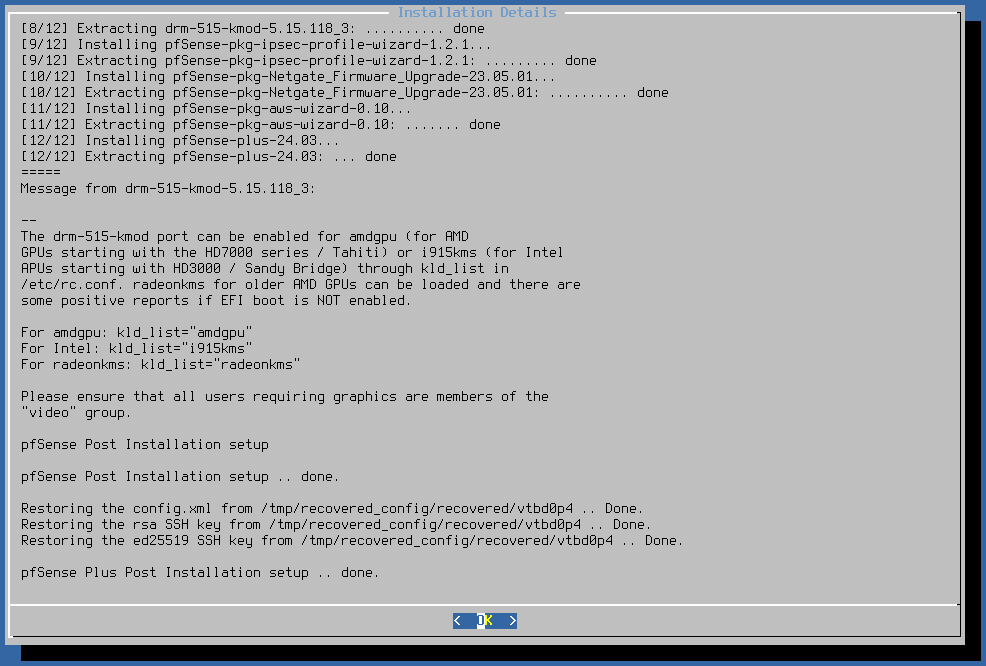
Fig. 4. pfSense console menu after installation
VLAN Configuration
The first prompt asks whether to configure VLAN interfaces. For most basic configurations, answer n (no). VLAN setup can be completed later through the web interface.
If VLANs are required from the outset (e.g., when connecting to a switch trunk port), answer y and specify the VLAN tag number and priority.
WAN and LAN Assignment
The system displays a list of detected network interfaces with their MAC addresses and link status (up/down). Two methods are available for interface assignment.
Auto-detection:
- Disconnect all network cables
- Type
aand press Enter - Connect a cable to the interface designated as WAN
- Wait for link detection
- Press Enter to confirm
- Repeat for LAN and any additional interfaces
Manual assignment:
Enter the interface name (e.g., igb0, em0, vmx0, vtnet0) at the WAN prompt, then at the LAN prompt. Press Enter without typing a name to finish adding interfaces.
Interfaces can be identified by:
- MAC address displayed in the list
- Driver name (
igb- Intel,em- Intel,re- Realtek,vtnet- VirtIO,vmx- VMXNET3) - Link status (up/down) - connect a cable to the desired port and check which interface transitions to the up state
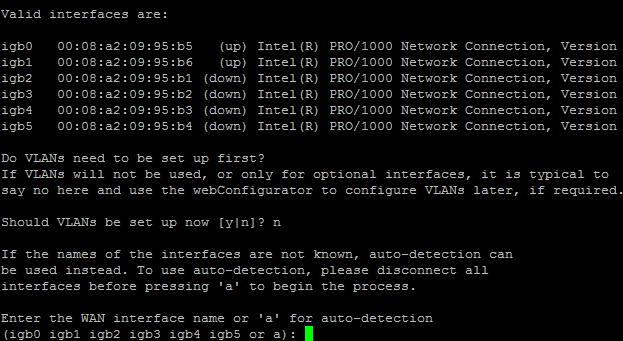
Fig. 5. WAN and LAN interface assignment
After assignment, the system requests confirmation: Do you want to proceed (y|n)?. Type y to apply the configuration.
Default Parameters After Assignment
| Parameter | Value |
|---|---|
| WAN IP | Obtained via DHCP |
| LAN IP | 192.168.1.1/24 |
| DHCP server on LAN | Enabled (range 192.168.1.100 - 192.168.1.199) |
| WAN firewall rules | All inbound traffic blocked |
| LAN firewall rules | All outbound traffic allowed |
| DNS Resolver | Enabled (Unbound) |
Initial Configuration via Web Interface
After interface assignment, pfSense is ready for configuration through the web GUI.
Accessing the Web Interface
- Connect a workstation to the pfSense LAN port
- Verify that the workstation has obtained an IP address via DHCP in the 192.168.1.0/24 subnet
- Open a browser and navigate to
https://192.168.1.1 - Accept the self-signed certificate warning
- Enter the default credentials: username
admin, passwordpfsense
Warning:
The default credentials must be changed immediately after the first login. Leaving the default password in place represents a serious security risk.
Setup Wizard
On the first login, the Setup Wizard launches automatically, guiding through the core configuration parameters:
- Hostname and Domain - system hostname and domain (e.g.,
pfsense.local) - DNS Servers - ISP DNS server addresses or public DNS resolvers (8.8.8.8, 1.1.1.1)
- Time Zone - time zone selection and NTP server
- WAN Configuration - connection type (DHCP, Static, PPPoE), ISP parameters, MTU
- LAN Configuration - LAN interface IP address and subnet mask
- Admin Password - mandatory change of the default password
- Apply Configuration - save and apply all settings
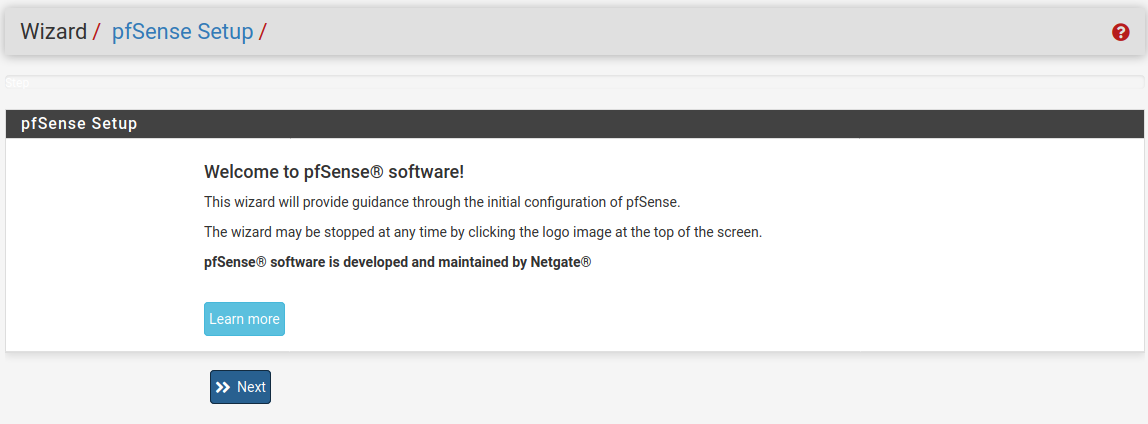
Fig. 6. Setup Wizard - initial configuration
After the wizard completes, the pfSense Dashboard appears. The system is ready for further configuration of firewall rules, VPN, NAT, and other services.
Installation in Virtual Environments
When deploying pfSense in a virtual environment, the installation process mirrors physical hardware but requires consideration of hypervisor-specific details. Per-platform requirements are described in the system requirements section.
VMware ESXi
- Attach the ISO image via the virtual machine’s virtual CD/DVD drive
- Set the guest OS type to FreeBSD 14 (64-bit)
- Network adapters: VMXNET3 for optimal performance
- Disk controller: PVSCSI (minimum disk size 8 GB)
- Ensure AES-NI instruction passthrough is enabled in CPU settings
Proxmox VE
- Upload the ISO image to Proxmox storage (Datacenter > Storage > ISO Images)
- Machine type: q35
- Network adapters: VirtIO (virtio-net) - drivers are included in the FreeBSD kernel
- Disk controller: VirtIO SCSI
- CPU type: host (to pass through hardware instructions)
KVM / QEMU (without Proxmox)
Example virtual machine creation:
virt-install \
  --name pfsense \
  --ram 2048 \
  --vcpus 2 \
  --disk size=16,bus=virtio \
  --cdrom /path/to/pfSense-plus-installer.iso \
  --network bridge=br0,model=virtio \
  --network bridge=br1,model=virtio \
  --os-variant freebsd14.0 \
  --graphics vnc
For headless installation via serial console, use the Serial image and add --console pty,target_type=serial.
Hyper-V
- Create a Generation 2 virtual machine
- Disable Secure Boot in VM settings - pfSense will not boot otherwise
- Use Hyper-V synthetic network adapters
- Attach the ISO image via the virtual DVD drive
General Recommendations
- Allocate fixed memory (do not use dynamic memory allocation)
- Create separate virtual switches or network bridges for WAN and LAN
- Remove the virtual CD/DVD drive from the VM configuration after installation
- For high-throughput scenarios, consider PCI Passthrough of physical network adapters
Troubleshooting
Network Adapter Not Detected
Symptom: The installer or the post-installation system does not display one or more network interfaces.
Solutions:
- Check adapter compatibility with the FreeBSD version underlying your pfSense release. The compatible hardware list is available in the FreeBSD Hardware Notes
- USB network adapters are not supported and will not be detected
- In virtual environments, verify that a supported adapter type is used (VirtIO, VMXNET3, E1000) - emulated rtl8139 and ne2k adapters may not be recognized
- When using PCI Passthrough, confirm that IOMMU (VT-d / AMD-Vi) is enabled in BIOS
System Does Not Boot from Installation Media
Symptom: The system ignores the USB drive or DVD at boot and loads from the internal disk.
Solutions:
- Check boot priority in BIOS/UEFI - USB must rank higher than the internal disk
- For UEFI systems, verify that Secure Boot is disabled
- If the USB drive does not appear in the boot menu, try a different USB port (USB 2.0 instead of USB 3.0 on older hardware)
- Confirm that the image was written to the disk as a raw image, not copied as a file. The image must be written using
ddor Etcher, not by simply copying the file to the flash drive - Verify image integrity using the SHA-256 checksum
System Does Not Boot After Installation
Symptom: After installation completes and the system reboots, it fails to boot from the internal disk.
Solutions:
- Remove the installation media before booting
- Verify that the correct boot disk is selected in BIOS
- If GPT was used on hardware without UEFI support, try reinstalling with MBR partitioning
- Confirm the disk is not damaged - relaunch the installer and use the Wipe Disks option in Advanced Options before reinstalling
Cannot Access the Web Interface
Symptom: The browser cannot reach https://192.168.1.1 after installation.
Solutions:
- Verify that the workstation is connected to the LAN port, not WAN
- Confirm the workstation has an IP address in the 192.168.1.0/24 subnet (via DHCP or manually assigned)
- If the LAN address was changed during installation, use the current address
- Try HTTP instead of HTTPS:
http://192.168.1.1 - From the pfSense console, select 2) Set interface(s) IP address to verify or change the LAN IP address
- Select 16) Restart PHP-FPM from the console menu to restart the web server
ZFS Installation Errors
Symptom: The installer reports errors when creating the ZFS pool.
Solutions:
- When installing in Mirror or RAID-Z mode, verify that enough disks are selected
- Use the Wipe Disks option to clear previous filesystem metadata from target disks
- For systems with less than 4 GB storage, use UFS instead of ZFS - enable Low Capacity System mode in Advanced Options
Related Sections
- pfSense System Requirements - verify hardware compatibility before installation
- Upgrading pfSense - version upgrades after a successful installation
- Firewall Rules - configuring filter rules after completing initial setup