Fig. 1. Phase 1 configuration for mobile clients
### General Information | Field | Value | Notes | |---|---|---| | Key Exchange version | IKEv2 | Required for mobile clients | | Internet Protocol | IPv4 | Or IPv6, depending on addressing | | Interface | WAN | Interface for accepting connections | | Description | `IKEv2 Mobile Clients` | Description for identification | ### Phase 1 Proposal - Authentication | Field | Value | Notes | |---|---|---| | Authentication Method | EAP-MSCHAPv2 | Username/password authentication | | My identifier | Distinguished Name: `vpn.example.com` | Must match CN or SAN of the server certificate | | Peer identifier | Any | Mobile clients - identifier unknown in advance | | My Certificate | `IKEv2 VPN Server` | Server certificate created earlier | | My Certificate Authority | `IKEv2 VPN CA` | CA that signed the server certificate | When using certificate-based authentication instead of EAP-MSCHAPv2, select **Authentication Method: Mutual RSA** and specify the appropriate CA for validating client certificates. > **Warning**: > > When using EAP-MSCHAPv2, users must be created in **System > User Manager** with passwords. These credentials are used to authenticate VPN connections. ### Phase 1 Proposal - Encryption Algorithm | Field | Value | Notes | |---|---|---| | Algorithm | AES-256-GCM | Authenticated encryption with hardware acceleration | | Key Length | 256 bits (auto) | With AES-GCM, key length is determined automatically | | Hash | SHA256 | PRF (Pseudo-Random Function) | | DH Group | 14 (2048 bit) | Minimum recommended group | For compatibility with a broader range of clients, additional Encryption Algorithms may be added. Recommended set: | Algorithm | Hash | DH Group | Note | |---|---|---|---| | AES-256-GCM | SHA256 | 14 | Primary (Windows 10/11, macOS, iOS) | | AES-256-CBC | SHA256 | 14 | Fallback (Android, older clients) | ### Expiration and Replacement | Field | Value | Notes | |---|---|---| | Life Time | 28800 | 8 hours | | Rekey Time | (empty) | Automatic calculation | | Reauth Time | (empty) | Automatic calculation | ### Advanced Options | Field | Value | Notes | |---|---|---| | NAT Traversal | Auto | Automatic NAT detection | | MOBIKE | Enable | Support for network switching | | Dead Peer Detection | Enabled | Detect disconnected clients | | DPD Delay | 30 | DPD interval in seconds | | DPD Max Failures | 5 | Missed responses before disconnect | > **Warning**: > > MOBIKE must be enabled for mobile clients. Without MOBIKE, the VPN connection drops when switching networks (for example, when moving from Wi-Fi to LTE). ## Phase 2 Configuration After saving Phase 1, a Phase 2 entry must be created. Click **Show Phase 2 Entries**, then **Add P2**. 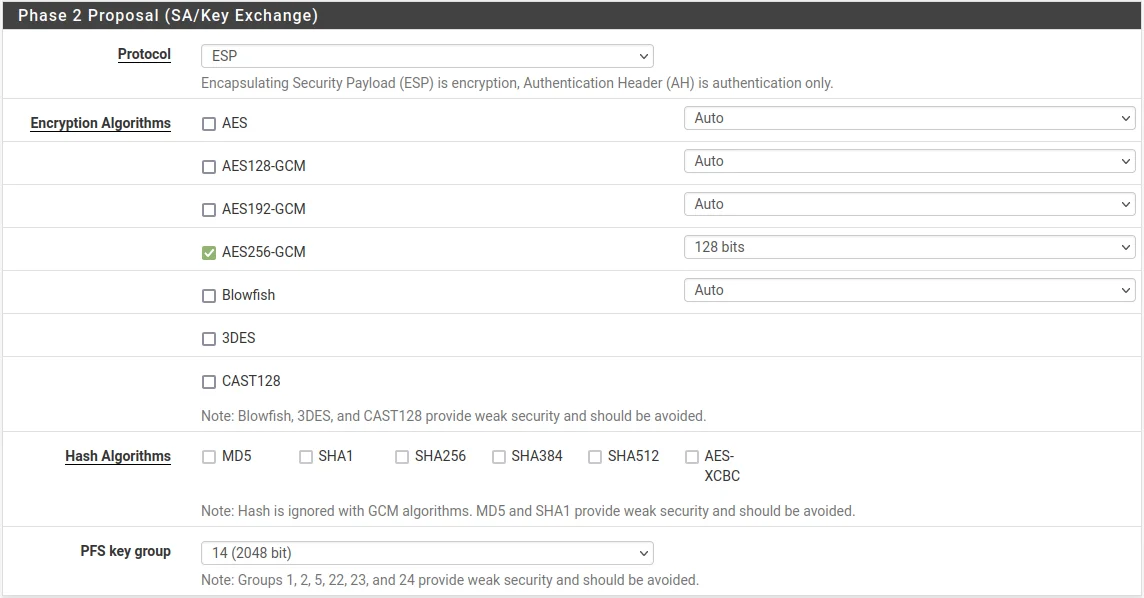Fig. 2. Phase 2 configuration for mobile clients
### General Information | Field | Value | Notes | |---|---|---| | Mode | Tunnel IPv4 | Standard mode | | Local Network | LAN subnet | Or a specific subnet: `10.1.0.0/24` | | NAT/BINAT | None | No address translation | | Description | `IKEv2 Mobile - LAN Access` | Phase 2 description | When access to multiple subnets (LAN, DMZ, server network) is required, create a separate Phase 2 entry for each subnet. ### Phase 2 Proposal | Field | Value | Notes | |---|---|---| | Protocol | ESP | Traffic encryption and authentication | | Encryption Algorithms | AES-256-GCM | Must match client capabilities | | Hash Algorithms | SHA256 | For compatibility with clients lacking GCM support | | PFS key group | 14 (2048 bit) | Perfect Forward Secrecy | ### Expiration and Replacement | Field | Value | Notes | |---|---|---| | Life Time | 3600 | 1 hour | | Rekey Time | (empty) | Automatic calculation | ## Firewall Rules Two sets of firewall rules are required for IKEv2 VPN to function: on the **WAN** tab and the **IPsec** tab. ### WAN Interface Rules Inbound traffic for establishing IKE connections must be permitted on the WAN interface. | Action | Protocol | Source | Destination Port | Description | |---|---|---|---|---| | Pass | UDP | Any | 500 | IKE - key exchange | | Pass | UDP | Any | 4500 | NAT-T - ESP encapsulation in UDP | pfSense automatically creates rules for IKE traffic when IPsec tunnels are configured. However, when using floating rules or a non-standard firewall configuration, these rules may need to be added explicitly. ### IPsec Tab Rules The **Firewall > Rules > IPsec** tab controls traffic passing through the VPN tunnel. By default, all traffic is blocked. Minimum rule set: | Action | Protocol | Source | Destination | Description | |---|---|---|---|---| | Pass | Any | `10.10.10.0/24` | LAN net | Allow traffic from VPN pool to LAN | | Pass | Any | `10.10.10.0/24` | `10.10.10.0/24` | Allow traffic between VPN clients | In production environments, rules should be restricted to specific protocols and ports. For example, allow only DNS (UDP/TCP 53), RDP (TCP 3389), SSH (TCP 22), and HTTPS (TCP 443). For more details on firewall rules, see [pfSense Firewall Rules](/docs/pfsense/firewall/pfsense-firewall-rules/). ## Client Configuration ### Windows 10/11 Windows 10 and 11 support IKEv2 through the built-in VPN client. To connect, the CA certificate must be imported and a VPN connection created. #### Importing the CA Certificate 1. Export the CA certificate from pfSense: **System > Cert. Manager > CAs** - click the CA Certificate export icon. 2. Copy the `.crt` file to the Windows computer. 3. Double-click the `.crt` file. 4. Click **Install Certificate**. 5. Select **Local Machine** and click **Next**. 6. Select **Place all certificates in the following store** and click **Browse**. 7. Select **Trusted Root Certification Authorities** and click **OK**. 8. Click **Next**, then **Finish**. > **Warning**: > > The CA certificate must be installed in the **Trusted Root Certification Authorities** store of the computer (Local Machine), not the user (Current User). Otherwise, Windows will be unable to validate the server certificate. #### Creating the VPN Connection 1. Open **Settings > Network & Internet > VPN**. 2. Click **Add a VPN connection**. 3. Fill in the parameters: | Field | Value | |---|---| | VPN provider | Windows (built-in) | | Connection name | `Office VPN` | | Server name or address | `vpn.example.com` | | VPN type | IKEv2 | | Type of sign-in info | User name and password | | User name | (username from pfSense) | | Password | (user password) | 4. Click **Save**. 5. To connect, click the VPN connection and click **Connect**. #### Strengthening Security on Windows By default, Windows may use weak encryption algorithms. To enforce strong algorithms, run the following in PowerShell as Administrator: ```powershell Set-VpnConnectionIPsecConfiguration -ConnectionName "Office VPN" ` -AuthenticationTransformConstants GCMAES256 ` -CipherTransformConstants GCMAES256 ` -EncryptionMethod AES256 ` -IntegrityCheckMethod SHA256 ` -DHGroup Group14 ` -PfsGroup PFS2048 ` -Force ``` ### macOS macOS supports IKEv2 through built-in capabilities. Configuration requires importing the CA certificate and creating a network profile. #### Importing the CA Certificate 1. Export the CA certificate from pfSense in `.crt` format. 2. Open the file on macOS - Keychain Access will launch. 3. Add the certificate to the **System** keychain. 4. Double-click the added certificate. 5. Under **Trust**, set **When using this certificate** to **Always Trust**. 6. Close the window and enter the administrator password to confirm. #### Creating the VPN Connection 1. Open **System Settings > VPN** (macOS 13+) or **System Preferences > Network** (macOS 12 and earlier). 2. Click **Add VPN Configuration > IKEv2**. 3. Fill in the parameters: | Field | Value | |---|---| | Display Name | `Office VPN` | | Server Address | `vpn.example.com` | | Remote ID | `vpn.example.com` | | Local ID | (leave empty) | | User Authentication | Username | | Username | (username from pfSense) | | Password | (user password) | 4. Click **Create**. 5. To connect, toggle the VPN connection switch. ### iOS iOS supports IKEv2 without installing additional applications. #### Installing the CA Certificate Profile 1. Export the CA certificate from pfSense. 2. Transfer the `.crt` file to the device (via AirDrop, email, or a web server). 3. Open the file on the device - a prompt to install the profile will appear. 4. Navigate to **Settings > General > VPN & Device Management**. 5. Tap the downloaded profile and tap **Install**. 6. After installation, navigate to **Settings > General > About > Certificate Trust Settings**. 7. Enable trust for the installed CA certificate. #### Creating the VPN Connection 1. Navigate to **Settings > General > VPN & Device Management > VPN**. 2. Tap **Add VPN Configuration**. 3. Fill in the parameters: | Field | Value | |---|---| | Type | IKEv2 | | Description | `Office VPN` | | Server | `vpn.example.com` | | Remote ID | `vpn.example.com` | | Local ID | (leave empty) | | User Authentication | Username | | Username | (username from pfSense) | | Password | (user password) | 4. Tap **Done**. 5. To connect, toggle the VPN switch in Settings. ### Android Android supports IKEv2 natively starting from version 11 through the built-in VPN client. For earlier versions, the strongSwan VPN Client from Google Play is required. #### Android 11 and Later (Built-in Client) 1. Export the CA certificate from pfSense. 2. Navigate to **Settings > Security > Encryption & credentials > Install a certificate**. 3. Select **CA certificate** and install the `.crt` file. 4. Navigate to **Settings > Network & Internet > VPN**. 5. Tap **+** to add a new VPN profile. 6. Fill in the parameters: | Field | Value | |---|---| | Name | `Office VPN` | | Type | IKEv2/IPSec MSCHAPv2 | | Server address | `vpn.example.com` | | IPSec identifier | (leave empty) | | IPSec CA certificate | (select the installed CA) | | Username | (username from pfSense) | | Password | (user password) | 7. Tap **Save**. #### strongSwan VPN Client (Android 10 and Earlier) 1. Install **strongSwan VPN Client** from Google Play. 2. Import the CA certificate through the application. 3. Create a new VPN profile: | Field | Value | |---|---| | Server | `vpn.example.com` | | VPN Type | IKEv2 EAP (Username/Password) | | Username | (username from pfSense) | | Password | (user password) | | CA certificate | Select automatically | 4. Tap **Save** and connect. ## Split Tunnel vs Full Tunnel The tunneling mode determines which client traffic passes through the VPN. ### Full Tunnel With full tunneling, all client traffic is routed through the VPN, including internet access. This mode provides maximum protection but increases VPN server and bandwidth load. To configure Full Tunnel: 1. Under **VPN > IPsec > Mobile Clients**, uncheck **Provide a list of accessible networks to clients**. 2. In Phase 2, set **Local Network** to **Network / `0.0.0.0/0`**. 3. Configure an outbound NAT rule for VPN client traffic: **Firewall > NAT > Outbound** - add a rule for the `10.10.10.0/24` subnet on the WAN interface. > **Warning**: > > With Full Tunnel, Outbound NAT must be configured for the VPN client subnet. Without it, VPN clients will not have internet access through the tunnel. ### Split Tunnel With split tunneling, only traffic destined for specified networks passes through the VPN. All other traffic (including internet) uses the client's regular connection. To configure Split Tunnel: 1. Under **VPN > IPsec > Mobile Clients**, check **Provide a list of accessible networks to clients**. 2. In Phase 2, create a separate entry for each protected subnet (for example, `10.1.0.0/24` for LAN, `10.2.0.0/24` for the server network). 3. The subnet list from Phase 2 will be automatically pushed to clients. ### DNS Considerations with Split Tunnel With Split Tunnel, DNS queries may be routed through either the VPN or the local connection. This creates a DNS leak risk - queries for internal domains may be sent through the ISP. To minimize DNS leakage: - Push a DNS server to clients through the Mobile Clients settings. - On Windows: use the NRPT (Name Resolution Policy Table) to route DNS queries for specific domains through the VPN. - On macOS/iOS: DNS traffic to the specified server is automatically routed through the VPN when routes are correctly configured. ## Troubleshooting ### Client Cannot Connect | Problem | Cause | Solution | |---|---|---| | Timeout during connection | UDP 500/4500 blocked | Verify firewall rules on WAN and with the ISP | | `IKE authentication credentials are unacceptable` | Incorrect username/password | Verify credentials in User Manager | | `The certificate chain is not trusted` | CA certificate not installed | Install the CA certificate in the trusted store on the client | | `The remote server is not responding` | Incorrect server address | Verify the server address in client settings and DNS resolution | ### Certificate Errors | Problem | Cause | Solution | |---|---|---| | `Certificate has expired` | Certificate validity period elapsed | Reissue the certificate in Cert. Manager | | `Certificate name mismatch` | CN/SAN does not match the address | Recreate the server certificate with the correct SAN | | iOS rejects certificate | Lifetime > 825 days | Recreate the server certificate with Lifetime of 825 or less | | Windows: `Error 13801` | Server certificate issue | Ensure the CA is installed in Local Machine, not Current User | ### EAP Errors | Problem | Cause | Solution | |---|---|---| | `EAP_MSCHAPV2 failed` | Incorrect credentials | Reset the user password in User Manager | | `no EAP method selected` | Wrong Authentication Method | Set EAP-MSCHAPv2 in Phase 1 | | Connection drops after 1 second | User not in the required group | Verify group restrictions in Mobile Clients | ### Connected but No Access to Resources | Problem | Cause | Solution | |---|---|---| | Cannot ping LAN hosts | Missing rules on the IPsec tab | Create rules allowing traffic from the VPN pool | | DNS not working | DNS server not pushed to client | Configure DNS Server in Mobile Clients | | No internet with Full Tunnel | Missing Outbound NAT | Add an Outbound NAT rule for the VPN subnet | ### Diagnostic Commands ```bash # View active IKEv2 sessions ipsec statusall # View connected mobile clients ipsec leases # View IPsec logs in real time clog -f /var/log/ipsec.log # Restart IPsec service ipsec restart ``` ## Related Sections - [IPsec Site-to-Site VPN in pfSense](/docs/pfsense/vpn/ipsec/pfsense-ipsec-site-to-site/) - configuring site-to-site tunnels, IPsec terminology, and general configuration principles - [IPsec VPN Troubleshooting in pfSense](/docs/pfsense/vpn/ipsec/pfsense-ipsec-troubleshooting/) - systematic IPsec diagnostics, log analysis, and resolving Phase 1/Phase 2 errors - [pfSense Firewall Rules](/docs/pfsense/firewall/pfsense-firewall-rules/) - principles of creating and managing firewall rules for VPN traffic