pfSense WireGuard VPN Setup - Complete Configuration Guide
WireGuard is a modern VPN protocol implemented as a kernel module that delivers performance comparable to hardware-accelerated IPsec while requiring significantly less configuration complexity. The protocol uses a fixed set of cryptographic primitives (Curve25519, ChaCha20, Poly1305, BLAKE2s), eliminating the need for cipher negotiation and removing an entire class of vulnerabilities related to weak algorithm selection.
Starting with pfSense 2.7, WireGuard is available as a built-in package. This guide covers the complete setup process: from tunnel creation to client connections across multiple platforms and site-to-site deployment between two locations.
WireGuard Advantages
WireGuard was designed with a focus on simplicity and performance. Its primary advantages include:
- Minimal codebase - approximately 4,000 lines of kernel code, making security audits substantially easier compared to IPsec (~400,000 lines) or OpenVPN (~100,000 lines).
- High performance - kernel-level operation eliminates context switching between user space and kernel space, achieving throughput of 1 Gbps and above on modern hardware.
- Fast connection establishment - key exchange completes in a single round-trip (1-RTT), whereas IKEv2 requires at least two exchanges.
- Modern cryptography - the fixed algorithm set prevents downgrade attacks and configuration errors.
- Built-in roaming - the protocol automatically updates the endpoint when a client’s IP address changes, which is essential for mobile devices.
- Minimal attack surface - WireGuard does not respond to packets from unauthorized sources (stealth mode), making the server invisible to port scanners.
Limitations
Before selecting WireGuard as a VPN protocol, the following limitations must be considered.
No Username/Password Authentication
WireGuard does not support username/password authentication. Peer identification relies exclusively on cryptographic keys. For organizations requiring centralized account management through LDAP or RADIUS, this may be a significant constraint. In such cases, consider OpenVPN with RADIUS authentication .
Static Address Assignment
WireGuard has no built-in mechanism for dynamic IP address assignment (no DHCP equivalent). Each peer must be manually assigned an address from the designated tunnel subnet. With a large number of clients, this requires maintaining an address allocation registry.
No Session Management
The protocol has no concept of sessions or connections. There is no way to determine whether a client is currently connected, except by checking the latest handshake timestamp on the Status > WireGuard page. Forcibly disconnecting a client is only possible by removing its public key from the peer configuration.
Limited Logging
WireGuard performs minimal logging at the kernel level. Information about connection attempts, authentication failures, and traffic details is limited. For environments with strict audit requirements (PCI DSS, HIPAA), this may require additional monitoring measures.
Port Binding Behavior
WireGuard accepts traffic on its designated UDP port across all firewall interfaces, not just a selected one. This must be taken into account when planning filtering rules.
Prerequisites
Before proceeding with the setup, ensure the following conditions are met:
- pfSense version 2.7.0 or later - WireGuard is available as a built-in package. To verify the version: System > General Setup.
- WireGuard package installed - install via System > Package Manager > Available Packages. Search for
WireGuardand click Install. - Static public IP address or configured Dynamic DNS on the pfSense WAN interface (for remote access scenarios).
- Dedicated tunnel subnet - use an RFC 1918 address range that does not overlap with existing networks. Example:
10.10.10.0/24. - Open UDP port on upstream equipment (if pfSense is behind NAT).
Tunnel Creation
WireGuard tunnels are created under VPN > WireGuard > Tunnels.
- Click Add Tunnel.
- Configure the tunnel parameters:
| Field | Value | Description |
|---|---|---|
| Enable | Checked | Activate the tunnel |
| Description | WG-RemoteAccess | Descriptive name for the tunnel |
| Listen Port | 51820 | Standard WireGuard port (can be changed) |
| Interface Keys | Generate | Generate key pair (private + public) |
| Interface Addresses | 10.10.10.1/24 | pfSense address within the tunnel |
- Click Save Tunnel.
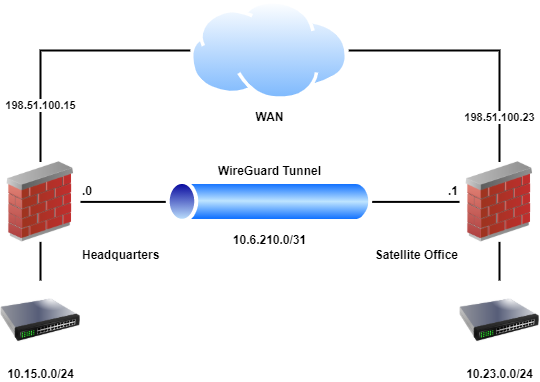
Fig. 1. Creating a WireGuard tunnel in the pfSense web interface
After saving, the system automatically generates a key pair. The public key is displayed on the tunnel page - copy it for subsequent distribution to clients.
Warning:
The private key must never be shared with third parties. Compromise of the private key requires immediate key pair regeneration and reconfiguration of all peers.
Port Selection
The standard WireGuard port is 51820/UDP. When using multiple tunnels, each must be assigned a unique port. If WireGuard needs to operate from networks with strict outbound traffic restrictions, port 443/UDP may be used, although this can conflict with HTTPS traffic when HAProxy or similar services are present.
Tunnel Addressing
A dedicated subnet should be allocated for tunnel addressing, with no overlap with other networks:
| Scenario | Recommended Subnet | Mask |
|---|---|---|
| Remote access (up to 254 clients) | 10.10.10.0 | /24 |
| Site-to-site (two nodes) | 10.10.10.0 | /30 |
| Multiple tunnels | 10.10.10.0, 10.10.20.0, … | /24 |
Adding Peers
Peers are added under VPN > WireGuard > Peers. Each client or remote node is a separate peer.
- Click Add Peer.
- Configure the parameters:
| Field | Value | Description |
|---|---|---|
| Enable | Checked | Activate the peer |
| Tunnel | WG-RemoteAccess | Select the previously created tunnel |
| Description | Laptop-Admin | Client description |
| Dynamic Endpoint | Checked | For clients with dynamic IP (remote access) |
| Public Key | (client key) | Public key generated on the client side |
| Pre-Shared Key | (optional) | Additional layer of protection (post-quantum security) |
| Allowed IPs | 10.10.10.2/32 | Client address within the tunnel |
| Keep Alive | 25 | Keepalive interval in seconds (for clients behind NAT) |
- Click Save Peer.
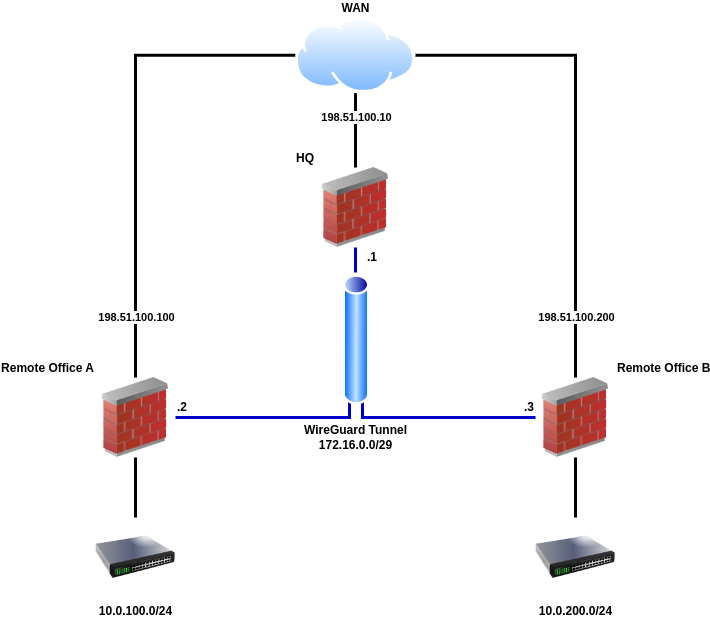
Fig. 2. Adding a WireGuard peer in pfSense
Key Exchange
Public key exchange between server and client is performed manually over a secure channel:
- The server (pfSense) generates a key pair during tunnel creation. The server’s public key is provided to the client.
- The client generates its own key pair (using the WireGuard client application). The client’s public key is entered in the Public Key field when adding a peer on pfSense.
Warning:
Public keys should be transmitted over a secure channel: in person, via an encrypted messenger, or through a corporate secrets management system. Public keys are not secrets themselves, but their substitution (MITM) would allow an attacker to impersonate a legitimate node.
The Allowed IPs Field
The Allowed IPs field determines which IP addresses are accepted from a given peer and which addresses are routed through the tunnel. Correct configuration of this field is critical:
| Scenario | Allowed IPs Value | Description |
|---|---|---|
| Remote access (single client) | 10.10.10.2/32 | Client tunnel address only |
| Site-to-site | 10.10.10.2/32, 192.168.2.0/24 | Peer address + remote subnet |
| Full tunnel (all traffic via VPN) | 0.0.0.0/0 | All IPv4 client traffic |
| Full tunnel (IPv4 + IPv6) | 0.0.0.0/0, ::/0 | All client traffic |
Pre-Shared Key (PSK)
Using a PSK adds a symmetric encryption layer on top of Curve25519. This provides additional protection in case the asymmetric algorithm is compromised (post-quantum resilience). A PSK is generated with:
wg genpskThe generated key is entered in the Pre-Shared Key field both on the pfSense side (in peer settings) and in the client configuration.
Interface Assignment
After creating the tunnel, an interface must be assigned to it in pfSense. Without interface assignment, it is not possible to create specific firewall rules for traffic within the tunnel.
- Navigate to Interfaces > Assignments.
- From the Available network ports dropdown, select the
tun_wgNinterface (where N is the tunnel number). - Click Add.
- Click on the assigned interface name (e.g., OPT1) to access its settings.
- Configure the parameters:
| Field | Value | Description |
|---|---|---|
| Enable | Checked | Activate the interface |
| Description | WIREGUARD | Interface name (displayed in firewall rules) |
| IPv4 Configuration Type | None | Addressing is already configured at the tunnel level |
| IPv6 Configuration Type | None | If IPv6 is not in use |
- Click Save, then Apply Changes.
Warning:
The IPv4 Configuration Type should remain set to None, as the IP address is already assigned at the WireGuard tunnel level. Assigning an address at both the interface and tunnel levels simultaneously can cause routing conflicts.
Firewall Rules
Two sets of rules are required for WireGuard to function correctly: on the WAN interface (to accept incoming connections) and on the WireGuard interface (to control traffic within the tunnel).
WAN Rule
Permits incoming UDP connections to the WireGuard port.
Navigate to Firewall > Rules > WAN and click Add.
| Field | Value |
|---|---|
| Action | Pass |
| Interface | WAN |
| Address Family | IPv4 |
| Protocol | UDP |
| Source | Any |
| Destination | WAN Address |
| Destination Port Range | 51820 (or configured tunnel port) |
| Description | Allow WireGuard VPN |
WireGuard Interface Rules
Control which traffic is permitted for VPN clients within the tunnel.
Navigate to Firewall > Rules > WIREGUARD (the assigned interface name) and click Add.
Option 1 - allow all traffic (for testing):
| Field | Value |
|---|---|
| Action | Pass |
| Interface | WIREGUARD |
| Address Family | IPv4 |
| Protocol | Any |
| Source | WIREGUARD net |
| Destination | Any |
| Description | Allow all WireGuard traffic |
Option 2 - allow LAN access only (recommended for production):
| Field | Value |
|---|---|
| Action | Pass |
| Interface | WIREGUARD |
| Address Family | IPv4 |
| Protocol | Any |
| Source | WIREGUARD net |
| Destination | LAN net |
| Description | Allow WireGuard to LAN |
An additional rule may be added to permit DNS access to the pfSense resolver:
| Field | Value |
|---|---|
| Action | Pass |
| Interface | WIREGUARD |
| Protocol | TCP/UDP |
| Source | WIREGUARD net |
| Destination | WIREGUARD Address |
| Destination Port Range | 53 |
| Description | Allow DNS from WireGuard |
For more details on firewall rule configuration: pfSense Firewall Rules .
Routing
Standard Routing (Split Tunnel)
By default, WireGuard in split tunnel mode routes only traffic destined for subnets specified in AllowedIPs on the client side through the VPN. All other client traffic uses the regular internet connection.
For routing between tunnel subnets and local pfSense networks, additional routes are typically not required, as pfSense automatically adds routes based on interface addressing.
Full Tunnel (All Traffic via VPN)
To route all client traffic through the VPN:
- On the client side: set
AllowedIPs = 0.0.0.0/0, ::/0in the WireGuard configuration. - On pfSense: ensure that firewall rules on the WireGuard interface allow internet-bound traffic (Destination: Any).
- NAT: configure Outbound NAT for the WireGuard subnet. Navigate to Firewall > NAT > Outbound, switch to Hybrid or Manual mode, and add a rule:
| Field | Value |
|---|---|
| Interface | WAN |
| Address Family | IPv4 |
| Protocol | Any |
| Source | 10.10.10.0/24 (tunnel subnet) |
| Destination | Any |
| Translation Address | WAN Address |
Static Routes
When configuring a site-to-site tunnel, static routes may be required if pfSense is not the default gateway for the subnet behind WireGuard.
Navigate to System > Routing > Static Routes and add a route:
| Field | Value |
|---|---|
| Destination network | 192.168.2.0/24 (remote subnet) |
| Gateway | WireGuard interface gateway |
Warning:
When configuring routing through WireGuard, ensure that the Default gateway in System > Routing is not set to Automatic. Otherwise, pfSense may designate the WireGuard interface as the default gateway, resulting in loss of internet connectivity.
Client Connections
To connect to the WireGuard server on pfSense, a client requires:
- The server’s (pfSense) public key
- The server’s public IP address or domain name
- The WireGuard port on the server
- The assigned client IP address within the tunnel
- The Pre-Shared Key (if configured)
Client Configuration Template
WireGuard client configuration uses a unified format across all platforms:
[Interface]
PrivateKey = <private_key_client>
Address = 10.10.10.2/32
DNS = 10.10.10.1

[Peer]
PublicKey = <public_key_pfsense>
PresharedKey = <psk_if_used>
AllowedIPs = 10.10.10.0/24, 192.168.1.0/24
Endpoint = vpn.example.com:51820
PersistentKeepalive = 25
Configuration parameters:
| Parameter | Description |
|---|---|
PrivateKey | Client private key (generated on the client) |
Address | Client IP address in the tunnel (must match Allowed IPs on the server) |
DNS | DNS server to use while the tunnel is active |
PublicKey | Server (pfSense) public key |
PresharedKey | Pre-Shared Key (optional) |
AllowedIPs | Subnets routed through the tunnel |
Endpoint | WireGuard server address and port |
PersistentKeepalive | Keepalive interval in seconds (required behind NAT) |
Windows
- Download the WireGuard client from the official website: wireguard.com/install .
- Install the application.
- Click Add Tunnel > Add empty tunnel or Import tunnel(s) from file.
- For manual creation, paste the configuration into the text field. The private key is generated automatically when creating an empty tunnel.
- Click Save, then Activate.
When creating an empty tunnel, the application automatically generates a key pair and displays the public key - copy it and add it to the peer settings on pfSense.
macOS
- Install WireGuard from the Mac App Store or via Homebrew:
brew install wireguard-toolsGUI client (App Store): import a
.confconfiguration file or create a tunnel manually through the application interface.Command line: create a configuration file and activate the tunnel:
# Generate key pair
wg genkey | tee privatekey | wg pubkey > publickey

# Create configuration
sudo mkdir -p /etc/wireguard
sudo nano /etc/wireguard/wg0.conf

# Activate tunnel
sudo wg-quick up wg0

# Check status
sudo wg show
Linux
- Install WireGuard:
# Debian / Ubuntu
sudo apt install wireguard

# CentOS / RHEL 8+
sudo dnf install wireguard-tools

# Fedora
sudo dnf install wireguard-tools- Generate a key pair:
wg genkey | tee /etc/wireguard/privatekey | wg pubkey > /etc/wireguard/publickey
chmod 600 /etc/wireguard/privatekey- Create the configuration file
/etc/wireguard/wg0.conf:
[Interface]
PrivateKey = <content_of_privatekey>
Address = 10.10.10.2/32
DNS = 10.10.10.1

[Peer]
PublicKey = <public_key_pfsense>
PresharedKey = <psk_if_used>
AllowedIPs = 10.10.10.0/24, 192.168.1.0/24
Endpoint = vpn.example.com:51820
PersistentKeepalive = 25- Tunnel management:
# Activate
sudo wg-quick up wg0

# Deactivate
sudo wg-quick down wg0

# Enable autostart
sudo systemctl enable wg-quick@wg0

# Check status
sudo wg show
iOS
- Install the WireGuard application from the App Store.
- Tap + and select one of the following options:
- Create from QR code - scan a QR code containing the configuration (preferred method).
- Create from file or archive - import a
.conffile. - Create from scratch - enter parameters manually.
- Activate the tunnel using the toggle switch.
Android
- Install the WireGuard application from Google Play.
- Tap + and select:
- Scan from QR code - scan a QR code.
- Import from file or archive - import a
.conffile. - Create from scratch - enter parameters manually.
- Activate the tunnel.
QR Code Generation
For mobile clients, QR codes provide the most convenient setup method. Generate them on Linux or macOS:
# Install qrencode
sudo apt install qrencode    # Debian/Ubuntu
brew install qrencode         # macOS

# Generate QR code from configuration file
qrencode -t ansiutf8 < /path/to/client.conf

# Save QR code as PNG
qrencode -t png -o client-qr.png < /path/to/client.confWarning:
The QR code contains the client’s private key. After the client has scanned the code, the PNG file should be deleted. Do not transmit QR codes through unsecured channels (email, messengers without end-to-end encryption).
Site-to-Site Configuration
WireGuard can establish a tunnel between two pfSense locations to interconnect remote networks. Compared to IPsec, site-to-site configuration with WireGuard is considerably simpler and does not require negotiating numerous cryptographic parameters.
Network Diagram
Site A                              Site B
┌─────────────────┐                ┌─────────────────┐
│ LAN: 10.1.0.0/24│                │ LAN: 10.2.0.0/24│
│ WG:  10.10.10.1 │────WireGuard───│ WG:  10.10.10.2 │
│ WAN: 203.0.113.1│                │ WAN: 198.51.100.1│
└─────────────────┘                └─────────────────┘
Site A Configuration
Create a tunnel (VPN > WireGuard > Tunnels):
- Listen Port:
51820 - Interface Address:
10.10.10.1/30 - Generate key pair.
- Listen Port:
Add a peer (VPN > WireGuard > Peers):
| Field | Value |
|---|---|
| Tunnel | Site A tunnel |
| Public Key | Site B public key |
| Endpoint | 198.51.100.1 |
| Endpoint Port | 51820 |
| Allowed IPs | 10.10.10.2/32, 10.2.0.0/24 |
| Keep Alive | 25 |
- Assign the interface and create firewall rules (as described above).
Site B Configuration
Site B configuration mirrors Site A:
- Tunnel: Listen Port
51820, Interface Address10.10.10.2/30. - Peer: Site A Public Key, Endpoint
203.0.113.1:51820, Allowed IPs10.10.10.1/32, 10.1.0.0/24. - Interface and firewall: identical to Site A.
Inter-Site Routing
A static route to the remote subnet must be added on each site:
Site A (System > Routing > Static Routes):
| Field | Value |
|---|---|
| Destination | 10.2.0.0/24 |
| Gateway | WireGuard gateway |
Site B:
| Field | Value |
|---|---|
| Destination | 10.1.0.0/24 |
| Gateway | WireGuard gateway |
If pfSense is the default gateway for all LAN devices, no routes need to be added on client devices. Otherwise, devices on the LAN must have a route to the remote subnet via pfSense.
Connectivity Verification
# From Site A, verify connectivity to Site B LAN
ping 10.2.0.1

# Check WireGuard tunnel status
# On pfSense: Status > WireGuard
# Verify latest handshake timestamp and transferred data
Comparison with IPsec and OpenVPN
When selecting a VPN protocol for pfSense, the characteristics of each should be evaluated.
| Characteristic | WireGuard | IPsec (IKEv2) | OpenVPN |
|---|---|---|---|
| Operating level | Kernel | Kernel | User space |
| Performance | High (1+ Gbps) | High (with AES-NI) | Medium (300-500 Mbps) |
| Connection setup time | 1-RTT (~100 ms) | 4 IKEv2 messages | TLS handshake (~500 ms) |
| Codebase size | ~4,000 lines | ~400,000 lines | ~100,000 lines |
| Authentication | Keys | PSK / Certificates / EAP | Certificates / LDAP / RADIUS |
| Dynamic client IPs | No | Yes (Mode Config) | Yes (built-in DHCP) |
| NAT traversal | Built-in | NAT-T (UDP 4500) | TCP 443 (bypasses restrictions) |
| Logging | Minimal | Detailed | Detailed |
| Compatibility | Linux, Windows, macOS, iOS, Android | All platforms, network equipment | All platforms |
| Session management | No | Yes | Yes |
| pfSense support | Package (since 2.7) | Built-in | Built-in |
When to Choose WireGuard
- Maximum performance with minimal overhead is required.
- Small number of clients (up to 50) where manual key management is feasible.
- Username/password authentication or LDAP/RADIUS integration is not needed.
- Simplicity and configuration auditability are priorities.
When to Choose IPsec
- Integration with third-party equipment (Cisco, FortiGate, MikroTik).
- Compatibility with cloud VPN gateways (AWS VPN, Azure VPN Gateway) is required.
- Multiple Phase 2 entries for different subnets are needed.
- More details: IPsec Site-to-Site VPN .
When to Choose OpenVPN
- LDAP/RADIUS authentication is required.
- Clients connect from networks with strict restrictions (only TCP 443 is available).
- Detailed logging and session management are necessary.
- More details: OpenVPN Remote Access Server .
Troubleshooting
Handshake Not Completing
The most common issue is a failed handshake. Check the status on the Status > WireGuard page.

Fig. 3. Status > WireGuard page in pfSense
Possible causes:
| Symptom | Cause | Resolution |
|---|---|---|
| Latest handshake missing | Packets not reaching pfSense | Verify the WAN firewall rule and confirm the correct port |
| Latest handshake missing | Key mismatch | Verify that the server’s public key is correctly specified in the client configuration and vice versa |
| Latest handshake missing | PSK mismatch | Verify that the Pre-Shared Key is identical on both sides |
| Handshake present, no traffic | Incorrect Allowed IPs | Verify that Allowed IPs on the server contains the client address, and on the client contains the target subnets |
| Handshake present, no traffic | Missing WireGuard interface rules | Add rules on the WIREGUARD tab |
MTU Issues
WireGuard uses a default MTU of 1420 bytes (with a standard 1500 MTU on the physical interface). WireGuard overhead is 80 bytes for IPv4 (60 bytes WireGuard + 20 bytes outer IPv4 header) and 80 bytes for IPv6.
Symptoms of MTU problems:
- Ping works but HTTP connections hang.
- Large file transfers fail.
- SSH works but SCP/SFTP hangs on large files.
Resolution:
- Explicitly set the MTU in the client’s
[Interface]section:
[Interface]
PrivateKey = ...
Address = 10.10.10.2/32
MTU = 1420- With additional encapsulation (PPPoE, VLAN, double NAT), reduce the MTU:
| Scenario | Recommended MTU |
|---|---|
| Standard (Ethernet 1500) | 1420 |
| PPPoE (MTU 1492) | 1412 |
| Double NAT / CGNAT | 1400 |
| Behind another VPN tunnel | 1380 |
NAT Traversal
WireGuard natively supports operation through NAT. For clients behind NAT to function correctly:
- Set
PersistentKeepalive = 25in the client configuration. This forces the client to send keepalive packets every 25 seconds, maintaining an active NAT translation. - On the pfSense side, set Keep Alive to
25in the peer settings.
Without keepalive, the NAT translation expires (typically after 30-120 seconds), and the server loses the ability to send packets to the client.
Allowed IPs Misconfiguration
Incorrect Allowed IPs settings are the second most common cause of issues:
- On the server (pfSense): Allowed IPs for each peer must be unique. Two peers cannot have overlapping Allowed IPs. If two peers claim
10.10.10.2/32, traffic will be routed to the most recently added peer. - On the client: Allowed IPs determines which traffic is directed into the tunnel. A value of
0.0.0.0/0routes all traffic, while10.10.10.0/24, 192.168.1.0/24routes only traffic to the specified subnets (split tunnel).
Diagnostic Commands
With command-line access to pfSense (SSH or console):
# Check WireGuard interface status
wg show

# Check WireGuard interface details
wg show wg0

# Check routing table
netstat -rn | grep wg

# Check firewall logs for blocked packets
clog /var/log/filter.log | grep 51820

# Check WireGuard kernel module
kldstat | grep if_wg
External Port Accessibility Check
To verify WireGuard port accessibility from an external network, use nmap from another host:
nmap -sU -p 51820 vpn.example.comA status of open|filtered is normal for WireGuard, as the protocol does not respond to unauthorized packets.
Related Sections
- IPsec Site-to-Site VPN in pfSense - configuring an IPsec tunnel for interconnecting sites with support for third-party equipment
- OpenVPN Remote Access Server - setting up OpenVPN with certificate-based authentication and LDAP/RADIUS integration
- pfSense Firewall Rules - creating and managing traffic filtering rules across different interfaces